AIX (Advanced Interactive eXecutive) is a series of proprietary Unix operating systems developed and sold by IBM.
Performance Optimization With Enhanced RISC (POWER) version 7 enables a unique performance advantage for AIX OS.
POWER7 features new capabilities using multiple cores and multiple CPU threads, creating a pool of virtual CPUs.
AIX 7 includes a new built-in clustering capability called Cluster Aware
AIX POWER7 systems include the Active Memory Expansion feature.

Wednesday, August 31, 2011

Install AIX from scratch with screenshots

The screenshots are from an installation of AIX 7.1 onto a partition

AIX installation in pictures

Image

Boot

Image
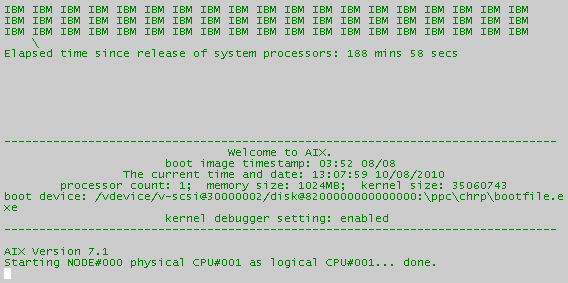
Installation starts with booting from media. In this case, from the AIX 7.1 DVD media.

Select Install Screen
Image
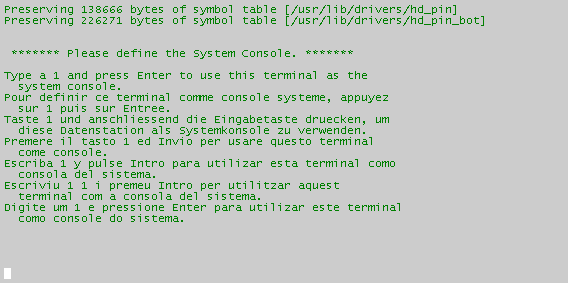
First we have to tell AIX which screen we are installing from. AIX sends a message to each screen -
whether it is a tty or lft (low function graphic terminal) with a number. Press that number followed by
the Enter key. The other displays clear and AIX continues with the selected screen.

Install Language
Image
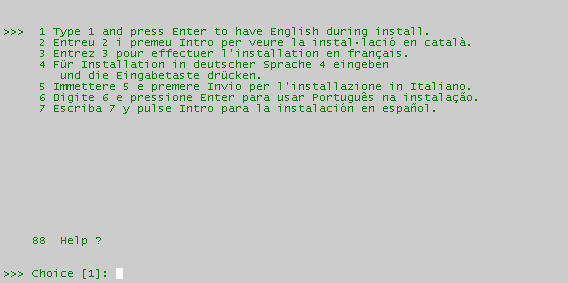
The first choice you need to make is language. English is pre-selected so just press enter.

Welcome to AIX
Image
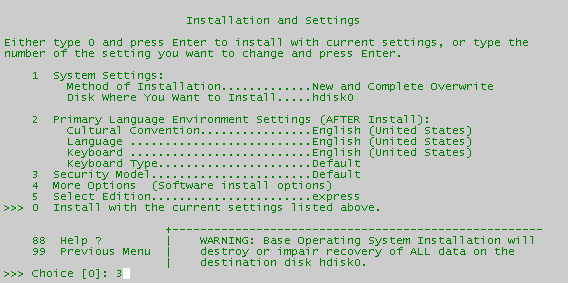
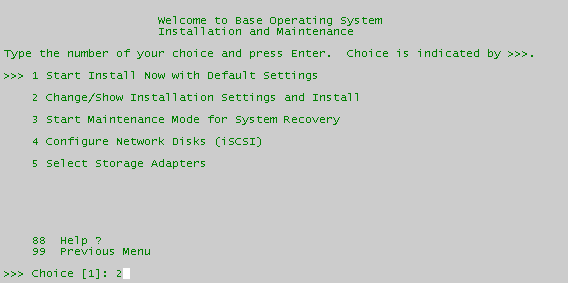
Although you could go through life accepting defaults, I prefer option 2 when installing AIX.

Installation Settings
Image
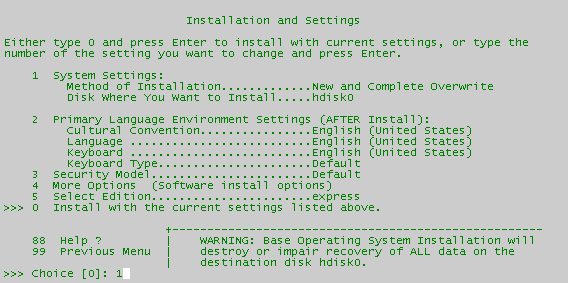
Use option 1 to ensure it is a New & Overwrite install - let's be fresh!
Then use option 2 to select your language of choice. I prefer using the USA English.

Set Primary Languge
Image
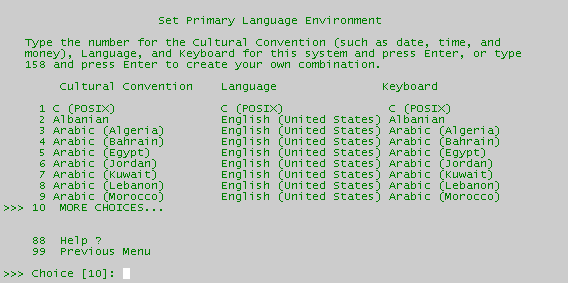
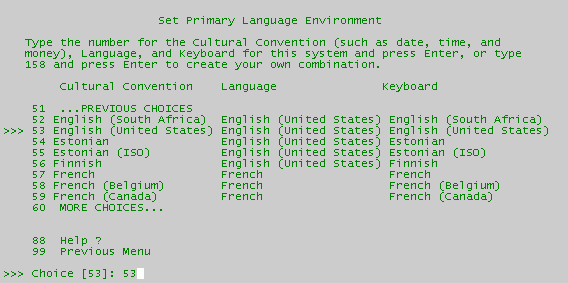
After you select option 2 note that the default choice is the next screen. Continue scrolling and enter your language number.
The screen after that is the keyboard selection. I always choose the "smaller" keyboard - option 1.
Image

Security

Image
For an initial install the defaults are probably fine, but let's take a peek.
Option 3 please.

Security Models
Image
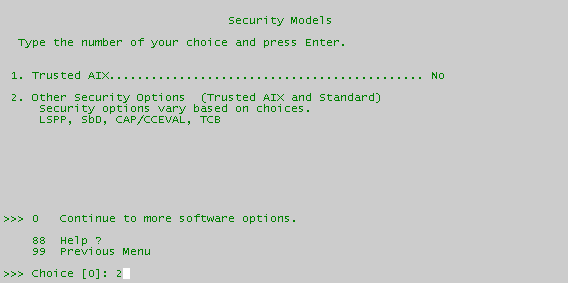
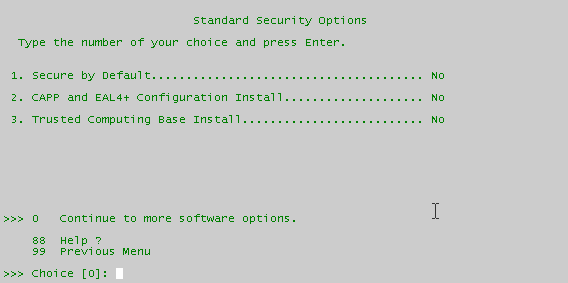
Do not start with Trusted AIX. That is an advanced topic we shall cover on another day. Since we are
looking at options - Option 2 please.

Standard Security Options
Image

Install Options

Image

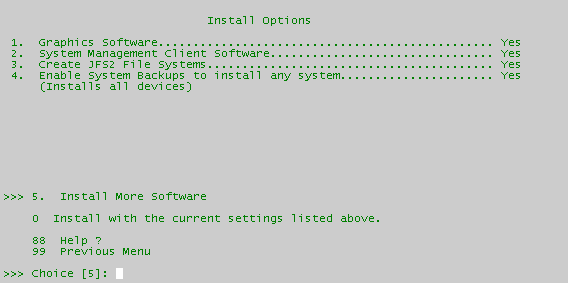
Normally you will leave all these options at yes.
Option 1. Graphics Software. X11 applications can run in client mode. This does not, by default, enable an
X11 server. Unless security policy specifically prohibits it, leave this option at yes.
Option 2. System Management Client Software. Highly recommended to leave this at yes for ease of remote
management of this system.
Option 3. AIX6 and higher is 64-bit kernel. JFS2 is optimized for an 64 bit-kernel. The is really no reason
not to use JFS2. Leave this at yes. You will need to reinstall AIX to get it into JFS2 if you do not.
Option 4. Enable System Backups to install to any system. This is an aid to system cloning. Leaving it to yes means
AIX installs many more filesets (nearly 500) and the install time takes longer. Sooner or later
all the filesets will be installed. Why, how and/or when you ask? When you update AIX to a (new) technology level
one of the side-effects is that all device drivers get installed. This is to prevent a mixture of device
drivers coming from different TL and or service-pack combinations. The recommendation is to leave it at yes.
Press Enter please (option 5 pre-selected)
 

Install More Software
Image

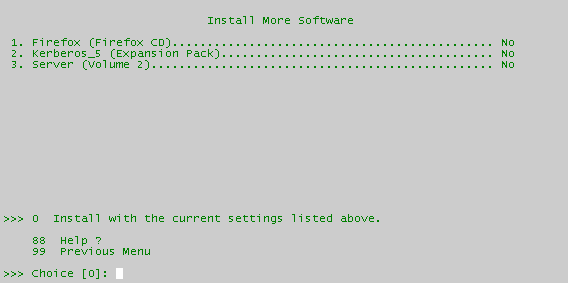
These options are all no by default.
Option 1: Firefox. If you want to work with Firefox on AIX change this to yes. The install process will prompt
you for the correct DVDs at the appropriate time to install Firefox. You can also do this later
using the smitty easy_install option to install the Firefox bundle.
Option 2: Not many people need Kerberos. If you do - switch to yes and the installation procedure prompts you
at the correct moment for the expansion DVD. What expansion DVD you ask? Then leave this at no. Again,
smitty easy_install will install the kerberos bundle later.
Option 3: Server. Back in the CDROM days you would install extra software from the second CDROM. It all fits
on one DVD now so you want get prompted for Volume 2 anymore. Why this option then? Think of it as the
opposite of "Secure by Default". This options installs the optional server filesets.

Take note: the next default action is to start installation. Press Enter!

Installation Summary
Image

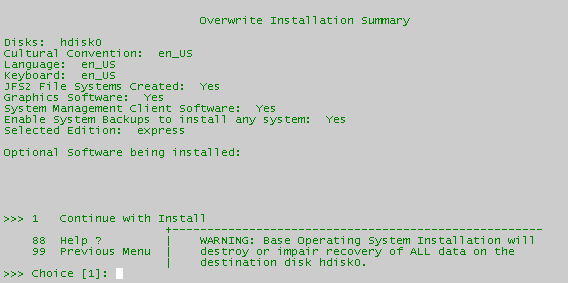
IBM would not be IBM (I guess) if it did not provide a summary screen (rather than a simple "Are you sure Y/N".
This screen summarizes what you have chosen. Default (option 1) is to really start installation, but you can
go back to the main installation menu (option 99) and make any changes you desire.

Installing Base Operating System
Image

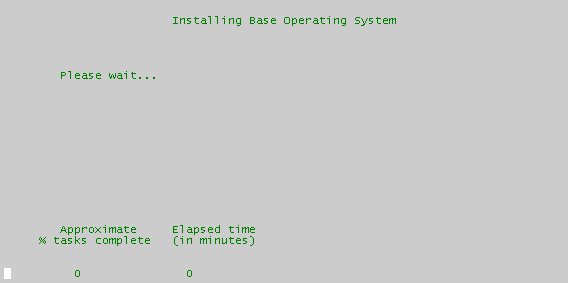
Once you see a screen like this, AIX installation has really started. A lot of information will scroll over the screen, but basically, you are done. Installing AIX from a DVD takes from 30 to 60 minutes - depending largely on the speed of the disks being written to. But then I test on systems that are 5+ years old. When I am on new hardware (at customers) installs take about 20 minutes.
When the installation is finished AIX reboots and configuration begins
AIX BOOTING


Introduction
The initial step in booting is the Power On Self Test (POST). Its purpose is to verify the basic hardware is functional state. The memory, keyboard, communication and audio device are also initialized. It is during this step you can press a function key to choose a different boot list. ( F1 – maintenance mode. F2 – Diagnostic mode in AIX). The System Read Only Storage (System ROS) is specific to each system type. It is necessary for AIX 5L V5.3 to boot, but it does not build the data structure required for booting. It will locate and load bootstrap code. System ROS contains generic boot information and is operating system independent. Software ROS (also named as bootstrap) forms an IPL control block which is compatible with AIX 5L V5.3, takes control and builds AIX 5L specific boot information. A specific file system located in memory and named RAMFS file system is created. Software ROS then locates, loads, and turns control over to AIX 5L boot logical volume (BLV). Software ROS is AIX 5L information created based on machine type and is responsible for completing machine preparation enable it to start AIX 5L kernel. A complete list of files that are a part of the BLV can be obtained from directory /usr/lib/boot.

Boot phase 1
  • The init process started from the RAMFS executes the boot script rc.boot. if init process fails for some reason code c06 is shown in the LED display.
  • At this stage the restbase command is called to copy a partial image of ODM from the BLV into the RAMFS. If this operation is successful LED display show 510, otherwise LED code 548 shown.
  • After this, the cfgmgr –f command reads the Config_rules class from the reduced ODM. In this class, devices with the attribute phase=1 are considered as the base devices. Base devices are the devices that are necessary to access rootvg. For example, if the rootvg is located on the hard disk, all devices starting from motherboard to the disk will have to be initialized. So rootvg can be activated in the boot phase 2.
  • At the end of the boot phase 1, bootinfo –b command is called to determine the last boot device, at this stage, the LED shows 511.

Boot phase 2
  • In the boot phase 2, the rc.boot script is passed to the parameter 2. During this phase the following steps are taken.
  • The root volume group is varied on with special version of varyonvg command named ipl_varyon command. If this command is successful the system will display 517, otherwise one of the LED codes will appear: 552, 554, 556 and the boot process is halted.
  • Then the root file system hd4 is checked using the command fsck –f command. This will verify only whether the file system was unmounted cleanly before the last shutdown. If the command fails the LED shows 555.
  • The root file system is mounted on a temporary mount point /mnt in the RAMFS. If this fails .557 will appear on the LED display.
  • The /usr file system is verified using the fsck –f command and then mounted. If the operation fails. 518 appear.
  • The /var file system is verified using the fsck –f command and then mounted.
  • The corecopy command checks if a dump occurred. If it did, it is copied from default dump device, /dev/hd6 (paging space), to the default copy directory /var/adm/ras after this /var is unmounted.
  • Then the primary paging space from rootvg /dev/hd6 will be activated.
  • The mergdev process is called and all /dev file system from the RAMFS are copied on to disk. All customized ODM files from the RAM file system are copied to disk both ODM versions from hd4 and hd5 are now synchronized.
  • Finally the root file system from rootvg disk is mounted over the root file system from the RAMFS. The mount points for the rootvg file systems became available.
  • Now the /var and /usr file system from the rootvg are mounted again on their ordinary mount points.
  • There is no console available at this stage, so all the boot message will be copied to alog. The alog command maintains and manages the logs.

Boot phase 3
  • After phase 2 is completed rootvg is activated and the following steps are taken. /etc/init process is started. It reads /etc/inittab file and calls the rc.boot with argument 3.
  • The /tmp file system is mounted.
  • The rootvg is synchronized by calling the syncvg command and launching it as background process. As a result all the stale partitions from the rootvg are updated, at this stage, the LED code 553 is shown.
  • At this stage cfgmgr command is called, if the system is booted in normal mode the cfgmgr is called with the option –p2. the cfgmgr command reads the Config_rules file from the ODM and calls all methods corresponding to either phase=2 or phase=3. All other devices that are not base devices are configured at this time.
  • Then the console is configured by the cfgcon command. After the configuration of the console. Boot message are sent to the console, if no STDOUT redirection is made. However, all missed messages can be found in /var/adm/ras/conslog. LED codes that can be displayed at this time are: c31 - console not configured. Provides instruction to select console. c32 - console is LFT terminal. c33 console is TTY. c34 console is a file on disk.
  • Finally, the synchronization of the ODM in the BLV with the ODM from the / (root) file system is done by the save base command.
  • The syncd daemon and the errdemon are started The LED display is turned off.
  • If the file /etc/nologin exists, it will be removed.
  • If there are devices marked as missing in CuDv a message is displayed on console.
  • The message system initialization completed is sent to the console.
  • The execution of the rc.boot has complete.
  • Process init will continue processing the next command from /etc/inittab. System initialization.
  • During system startup, after the root file system has been mounted in the pre-initialization process. The following sequence of event occurs:
  1. The init command is run as the last step of the startup process.
  2. The init command attempts to read the /etc/inittab file.
  3. If the /etc/inittab file exists. The init command attempts to locate an initdefault entry in the /etc/inittab file.
a) if the initdefault entry exist. The init command uses the specified run level as the initial system run level.
b) if the initdefault entry does not exists, the init command requests that the user enter a run level from the console
c) If the user enters an S, s, M, or m run level, the init command enters the maintenance run level. This is the only run level that does not require a properly formatted /etc/inittab file.
  1. If the /etc/inittab file does not exist, the init command places the system in the maintenance run level by default.
  2. The init command rereads the /etc/inittab file every 60 second. If the /etc/inittab file has changed since the last time the init command read it, the new command in the /etc/inittab file are executed.
  • The /etc/inittab file controls the initialization process
  • The /etc/inittab file supplies the script to the init command’s role as a general process dispatcher. The process that constitutes the majority of the init command’s process dispatching activities is the /etc/getty line process, which initiates individual terminal lines. Other processes typically dispatched by the init command are daemons and the shell.


Understanding the Boot Process
During the boot process, the system tests the hardware, loads and executes the operating system, and configures devices. To boot the operating system, the following resources are required:
  • A boot image that can be loaded after the machine is turned on or reset.
  • Access to the root and /usr file systems.
There are three types of system boots:

Hard Disk Boot
A machine is started for normal operations with the key in the Normal position. For more information, see "Understanding System Boot Processing" .
Diskless Network Boot
A diskless or dataless workstation is started remotely over a network. A machine is started for normal operations with the key in the Normal position. One or more remote file servers provide the files and programs that diskless or dataless workstations need to boot.
Service Boot
A machine is started from a hard disk, network, tape, or CD-ROM with the key set in the Service position. This condition is also called maintenance mode. In maintenance mode, a system administrator can perform tasks such as installing new or updated software and running diagnostic checks. For more information, see "Understanding the Service Boot Process" .

During a hard disk boot, the boot image is found on a local disk created when the operating system was installed. During the boot process, the system configures all devices found in the machine and initializes other basic software required for the system to operate (such as the Logical Volume Manager). At the end of this process, the file systems are mounted and ready for use. For more information about the file system used during boot processing, see "Understanding the RAM File System" .
The same general requirements apply to diskless network clients. They also require a boot image and access to the operating system file tree. Diskless network clients have no local file systems and get all their information by way of remote access.

BASIC VI EDITOR COMMANDS

General Startup
        To use vi: vi filename
        To exit vi and save changes: ZZ   or  :wq
        To exit vi without saving changes: :q!
        To enter vi command mode: [esc]
        A number preceding any vi command tells vi to repeat
        that command that many times.

        h       move left (backspace)
        j       move down
        k       move up
        l       move right (spacebar)
        [return]   move to the beginning of the next line
        $       last column on the current line
        0       move cursor to the first column on the
               current line
        ^       move cursor to first nonblank column on the
               current line
        w       move to the beginning of the next word or
               punctuation mark


        W       move past the next space
        b       move to the beginning of the previous word  or
               punctuation mark
       B       move to the beginning of the previous word, ignores
               punctuation
        e       end of next word or punctuation mark
        E       end of next word, ignoring punctuation
        H       move cursor to the top of the screen
        M       move cursor to the middle of the screen
        L       move cursor to the bottom of the screen
       G        move to the last line in the file
       xG       move to line x
       z+       move current line to top of screen
       z        move current line to the middle of screen
       z-       move current line to the bottom of screen
       ^F       move forward one screen
       ^B       move backward one line
       ^D       move forward one half screen
       ^U       move backward one half screen
       ^R       redraw screen
               ( does not work with VT100 type terminals )
       ^L       redraw screen
               ( does not work with Televideo terminals )


       r        replace character under cursor with next
               character typed
       R        keep replacing character until [esc] is hit
       i        insert before cursor
       a        append after cursor
       A        append at end of line
       O        open line above cursor and enter append mode
        x       delete character under cursor
        dd      delete line under cursor
        dw      delete word under cursor
        db      delete word before cursor
        yy      (yank)'copies' line which may then be put by
               the p(put) command. Precede with a count for
               multiple lines.
        brings back previous deletion or yank of lines,
        words, or characters
        P       bring back before cursor
        p       bring back after cursor


 Find Commands
        ?       finds a word going backwards
        /       finds a word going forwards
        f       finds a character on the line under the
               cursor going forward
        F       finds a character on the line under the
               cursor going backwards
        t       find a character on the current line going
               forward and stop one character before it
        T       find a character on the current line going
               backward and stop one character before it
        ;       repeat last f, F, t, T
        .       repeat last command
        u       undoes last command issued
        U       undoes all commands on one line
        xp      deletes first character and inserts after
               second (swap)
        J       join current line with the next line
        ^G      display current line number
        %       if at one parenthesis, will jump to its mate
        mx      mark current line with character x
        'x      find line marked with character x
        NOTE: Marks are internal and not written to the file.


        Any commands form the line editor ex can be issued
        upon entering line mode.
        To enter: type ':'
        To exit: press[return] or [esc]
        For a complete list consult the
        UNIX Programmer's Manual
        copies (reads) filename after cursor in file
        currently editing
        :r filename
        :w      saves the current file without quitting
MOVING
        :#      move to line #
        :$      move to last line of file
        executes 'cmd' as a shell command.

        :!'cmd'


Monday, August 29, 2011

Introduction to AIX...!!!!

AIX (Advanced Interactive eXecutive) is the name given to a series of proprietary operating systems sold by IBM for several of its computer system platforms, based on UNIX System V with 4.3BSD-compatible command and programming interface extensions. AIX runs on 32-bit or 64-bit IBM POWER or PowerPC CPUs (depending on version) and can address up to 32 terabytes (TB) of random access memory. The JFS2 file system.first introduced by IBM as part of AIX.allows computer files and partitions over 4 petabytes in size.


POWER/PowerPC-based systems: The release of AIX version 3 (sometimes called AIX/6000) coincided with the announcement of the first IBM RS/6000 models. The RS/6000 was unique in that it not only outperformed all other machines in integer compute performance, but also beat the competition by a factor of 10 in floating-point performance.[citation needed] Releases of AIX version 3 also took advantage of the developments in the POWER architecture. AIX v3 innovated in several ways on the software side. It was the first operating system to introduce the idea of a journalling file system, JFS, which allowed for fast boot times by avoiding the need to fsck the disks on every reboot. Another innovation was the introduction of shared libraries, which avoided the need for an application to statically link to the libraries it used. The resulting smaller binaries used less of the hardware RAM, to run, and used less of the disk space to install. Besides improving performance, it was a boon to developers: executable binaries could be in the 10s of kilobytes instead of a megabyte for an executable statically linked to the C library.


Figure 1. The evolution of AIX
evolving

AIX celebrated its own major anniversary, its 20th anniversary in January 2006, and it appears to have an extremely bright future in the UNIX space. IBM's AIX has been the only UNIX flavor that increased its market share through the years, and IBM continues to own the market space for UNIX servers. Most of the UNIX growth at this time stems from IBM. AIX has benefited from the many hardware innovations that the POWER platform has introduced through the continues to do so. It has also benefited from its virtualization engine - PowerVM™.
In a recent study on OS reliability, polling users from 27 countries, IBM's AIX led all server operating systems for downtime - approximately 30 minutes per server of downtime, per year. This has to do with AIX near Continuous Availability features.
During the early 1990's, there were five different RISC architectures that were actively competing with one another. IBM partnered with Apple and Motorola to come up with a common architecture, which would meet the standards of the alliance (A High-Performance Architecture with a History, 2006). Its first design was very simple and all instructions were completed in one clock cycle. It lacked floating point and parallel processing ability. The Power architecture was an attempt to correct this flaw. It consisted of over 100 instructions and was known as a complex RISC system. The Power1 chip consisted of 800,000 transistors per chip and was functional partitioned. It had separate floating point registers and could scale from the low- to the high-end workstations. The first chip actually had several chips on one single motherboard, but was refined to one RISC chip with more than 1 million transistors. It was used as the CPU for the Mars Pathfinder mission. While there were many other designs through the 1990's, it is true that the 1990's had mixed results for UNIX, as it lagged behind HP, Sun and other vendors.
IBM has made substantial improvements throughout the years on their IBM proprietary RISC-based hardware, where additional mainframe-type components are actually needed today to utilize the new architecture. Systems like the HMC (hardware management console) and the Hypervisor (software which runs on hardware machines and manages one or more operating systems) are important elements of the Power architecture.
The POWER5™ architecture, introduced in 2003, contained 276 million transistors per processor. It was based on the 130 nanometer copper/SOI Process and featured chip multiprocessing, a larger cache, a memory controller on the chip, simultaneous multi-threading (SMT), advanced power management, and improved hypervisor technology.
The POWER6®, with approximately 790 million transistors, debuted in June 2007. Its dual-core design enabled it to reach 4.7 GHz. Innovations in energy and cooling let it retain the same power consumption as the POWER5, while almost doubling performance. The POWER6 has hardware support for decimal arithmetic. It also has the first decimal floating-point unit integrated in silicon. Several important PowerVM Virtualization enhancements were also released with the POWER6, including Live Partition Mobility, Decimal Floating Point, and Dynamic Energy Management. The Power6 5.00 GHz processor, based on the Power 595 simply is the fastest system UNIX server in existence. The 64-core server outperforms the 128-core HP Integrity Superdome with more performance at one-half the amount of cores. The 595 also has 90% of the performance of the 256-core Sun SPARC Enterprise M9000 and 90% of the performance with one-quarter of the cores.
Power systems are based on mainframe-inspired reliability, availability, and serviceability (RAS) features such as First Failure Data Capture. This capability was also extended with introduction of the POWER6 processor-based servers to include Processor Instruction Retry, Alternate Processor Recovery, Partition Availability priority, Live Application Mobility, and Live Partition Mobility. All these features are designed to help enable you to eliminate systems-related planned and unplanned outages. If you need to take a system down for reconfiguration, firmware updates, or another reason, you will have the option of moving your applications to a different server without any impact to production operation. No reboots, no restarts, no service interruption, just continued outstanding service to your users.
How does AIX itself work with hardware to prevent outages? One example is storage keys. This new capability exploits the POWER6 hardware to provide additional isolation of kernel and application data. It prevents invalid changes to memory caused by programming errors. Application use of POWER6 storage keys are enabled in AIX 5.3 and the AIX kernel. The AIX kernel exploitation of POWER6 keys is included in AIX 6.1.
IBM is widely recognized as having the best virtualization product on the midrange, PowerVM. Some recent innovations include live application mobility (allowing one to fail over working partitions without downtime), Active Memory Sharing, and multiple shared processor pools. No other flavor of UNIX can boast these virtualization characteristics, nor can they match IBM's 40-year history of virtualization (PowerVM has evolved from mainframe/System z virtualization).
AIX runs only on IBM Power Systems, easily the most powerful of midrange UNIX servers. IBM sells the fact that AIX runs exclusively on Power as a plus because it is fully optimized on this architecture and it has a clear road map around which the company adheres to religiously. AIX has always had an integrated logical volume manager, unlike other flavors that require add-on products.


Introduction to UNIX !!

Unix is a computer operating system originally developed in 1969 by a group of AT&T employees at Bell Labs. Today's Unix systems are split into various branches, developed over time by AT&T as well as various commercial vendors and non-profit organizations. Unix was designed to be portable, multi-tasking and multi-user in a time-sharing configuration. Unix systems are characterized by various concepts: the use of plain text for storing data; a hierarchical file system; treating devices and certain types of inter-process communication (IPC) as files. Under Unix, the "operating system" consists of many of these utilities along with the master control program, the kernel. The kernel provides services to start and stop programs, handles the file system and other common "low level" tasks that most programs share, and, perhaps most importantly, schedules access to hardware to avoid conflicts if two programs try to access the same resource or device simultaneously. To mediate such access, the kernel was given special rights on the system, leading to the division between user-space and kernel-space.


Components: The Unix system is composed of several components that are normally packed together. By including – in addition to the kernel of an operating system – the development environment, libraries, documents, and the portable, modifiable source-code for all of these components, Unix was a self-contained software system. This was one of the key reasons it emerged as an important teaching and learning tool and has had such a broad influence. The inclusion of these components did not make the system large – the original V7 UNIX distribution, consisting of copies of all of the compiled binaries plus all of the source code and documentation occupied less than 10MB, and arrived on a single 9-track magnetic tape. The printed documentation, typeset from the on-line sources, was contained in two volumes.

Flavors of UNIX :

The widely used term flavors of UNIX refers to the many Unix-like operating systems that have been developed based on the original UNIX that was written in 1969 by Ken Thompson at Bell Labs.
Fragmentation of UNIX occurred almost from the beginning. It was the result of both commercial pressures and differences in opinion among developers as to the way in which operating systems should behave.
Among the ways in which the various flavors of UNIX differ are (1) fundamental design, (2) commands and features, (3) the hardware platform(s) (i.e., processors) for which they are intended and (4) whether they are proprietary software (i.e., commercial software) or free software (i.e., software that anyone can obtain at no cost and use for any desired purpose).
Many of the proprietary flavors have been designed to run only (or mainly) on proprietary hardware sold by the same company that has developed them. Examples include:
  • AIX - developed by IBM for use on its mainframe computers
  • BSD/OS - a commercial version of BSD developed by Wind River for Intel processors
  • HP-UX - developed by Hewlett-Packard for its HP 9000 series of business servers
  • IRIX - developed by SGI for applications that use 3-D visualization and virtual reality
  • QNX - a real time operating system developed by QNX Software Systems primarily for use in embedded systems
  • Solaris - developed by Sun Microsystems for the SPARC platform and the most widely used proprietary flavor for web servers
  • Tru64 - developed by Compaq for the Alpha processor

Others are developed by groups of volunteers who make them available for free. Among them are:

  • Linux - the most popular and fastest growing of all the Unix-like operating systems
  • FreeBSD - the most popular of the BSD systems (all of which are direct descendants of BSD UNIX, which was developed at the University of California at Berkeley)
  • NetBSD - features the ability to run on more than 50 platforms, ranging from acorn26 to x68k
  • OpenBSD - may have already attained its goal of becoming the most secure of all computer operating systems
  • Darwin - the new version of BSD that serves as the core for the Mac OS X
Today, there are three manufacturers that really dominate UNIX: IBM® (AIX) , Sun (Solaris) , and  HP (HP-UX)

AIX
AIX (Advanced Interactive eXecutive) is IBM's homegrown UNIX operating system. AIX was first introduced by IBM in 1986. IBM ported AIX to its RS/6000® platform in 1989. The release of AIX Version 3 coincided with the announcement of the first RS/6000 models. The unique factor of these systems were that they outperformed all other machines in integer-compute performance and also by a factor of 10 in floating-point performance.
Version 4 was introduced in 1994 and added support for symmetric multiprocessing (SMP) with the first RS/6000 SMP servers. The operating system continued to evolve until 1999, when AIX 4.3.3 introduced workload management (WLM). In May 2001, IBM unveiled AIX 5L, the L standing for "Linux affinity", which coincided with the release of its POWER4™ servers, which provided for the logical partitioning of servers. IBM created their first midrange hypervisor around this combination. More than any other factor, this was the breakthrough that IBM needed to challenge HP and SUN for UNIX supremacy. In just a few short years, IBM would dominate the market. In October of 2002, IBM announced dynamic logical partitioning (DLPAR) with AIX 5.2. AIX 5.3, introduced in August 2004, provided many new features: virtualization, security, reliability, systems management, and administration. Most importantly , AIX 5.3 fully supported the Advanced Power Virtualization (APV) capabilities of the POWER architecture; this included micropartioning, virtual I/O servers, and symmetric multithreading (SMT).

SunOS version 1.0 was first introduced in 1983, along with support for Sun-1 and Sun-2 systems. SunOS Version 2.0, introduced in 1985, came out with the virtual file system (VFS) and NFS. In 1987, AT&T and Sun first announced that they would work together to help merge System V and BSD into one release, based on System V, release 4. SunOS was originally developed from the BSD flavor of UNIX in 1983. It was later rebranded as Solaris (starting with version 5), based on AT&T System V release IV, in 1993. The first 64-bit version of Sparc Solaris 7 would add support for file system metadata logging. Solaris 9, introduced in 2002, added support for Solaris Volume Manager and Linux capabilities. Their most important release would be Solaris 10, which was first introduced in 2005 and included many new features such as support for its new ZFS file system, Solaris Containers, and Logical Domains.
Version 1 of HP's UNIX (HP-UX) was first released in 1984. It was originally based on System V, release 3, and it ran exclusively on their RISC - PA-RISC HP 9000 platform. Version 9 introduced its character-based graphical user interface (GUI), SAM, which allowed you to administrator the system without using the command line. Version 10 was introduced in 1995, which brought changes in the layout of the system file and directory structure, making it strikingly similar in many ways to AT&T SVR4. Version 11 was first introduced in 1997. This was HP's first release to support 64-bit addressing. In 2000, 11i came to be, which introduced operating environments, defined as bundled groups of layered applications for specific IT purposes. In 2001, Version 11.20 introduced support for Itanium systems. Interestingly enough, HP-UX was the first UNIX that used Access Control Lists (ACLs) for file permissions. It was also one of the first to introduce built-in support for Logical Volume Manager.